Monday, June 25, 2018

Dungeons & Dragons 5th Edition Character Options

Iron Seer D&D
*Updated 7/1/18*
At first, I was inclined to allow just about anything in 5e.

After playing for quite some time now, I've actually changed my mind.  It's mostly now unnecessary.  The wiki went off the rails pretty quick, so I've decided to lean back on the core.

Instead of having players wonder what's what and where's where, I decided to create and maintain this master list of 5e character options here for ease of reference.  I will probably create and maintain a master list like this for each edition as we progress, due to the amount of dead bodies that pile up in dungeons (especially the musty, creepy old ones).

To further aid in character creation, I recommend you check out Zero Hitpoint's cool character creation checklist.

List of Sources
  • Player's Handbook (PHB)
  • Dungeon Master's Guide (DMG)
  • Sword Coast Adventurer's Guide (SCAG)
  • Elemental Evil Player's Guide (EE)
  • Volo's Guide to Monsters (VG)
  • Xanathar's Guide to Everything (XG)
  • Unearthed Arcana (UA)
  • Tortle Package (TP)
  • One Grung Above (OGA)
List of Races
Races marked in THIS color are new player friendly!
  • Aarakocra (EE) 
  • Aasimar
    • Protector Aasimar (DMG/VG) 
    • Scourge Aasimar (DMG/VG) 
    • Fallen Aasimar (DMG/VG) 
  • Bugbear (VG) 
  • Dragonborn (PHB) 
  • Dwarf
    • Hill Dwarf (PHB) 
    • Mountain Dwarf (PHB) 
    • Gray Dwarf (SCAG) 
  • Elf
    • High Elf (PHB) 
    • Wood Elf (PHB) 
    • Dark Elf (PHB) 
  • Eladrin (DMG) 
  • Firbolg (VGM) 
  • Genasi
    • Air Genasi (EE)  
    • Earth Genasi (EE) 
    • Fire Genasi (EE) 
    • Water Genasi (EE)
  • Gnome
    • Forest Gnome (PHB) 
    • Rock Gnome (PHB) 
    • Deep Gnome (EE) 
  • Goblin (VG) 
  • Goliath (EE)
  • Grung (OGA)
  • Half-Elf
    • Half-Elf (PHB) 
    • Half-Wood Elf (SCAG) 
    • Half-Sun or Half-Moon Elf (SCAG) 
    • Half-Dark Elf (SCAG) 
    • Half-Aquatic Elf (SCAG) 
  • Half-Orc (PHB) 
  • Halfling
    • Lightfoot Halfing (PHB) 
    • Stout Halfing (PHB) 
    • Ghostwise Halfing (SCAG)
  • Hobgoblin (VG) 
  • Human
    • Human (PHB) 
    • Variant Human (PHB) 
  • Kenku (VG) 
  • Kobold (VG) 
  • Lizardfolk (VG) 
  • Orc (VG) 
  • Tabaxi (VG)
  • Tiefling
    • Tiefling (PHB) 
    • Feral Tiefling (SCAG) 
    • Devil’s Tongue Tiefling (SCAG) 
    • Winged Tiefling (SCAG) 
    • Hellfre Tiefling (SCAG) 
  • Tortle (TP/XG) 
  • Triton (VG) 
  • Yuan-Ti Pureblood (VG)
List of Classes
  • Barbarian
    • Path of the Berserker (PHB) 
    • Path of the Totem Warrior (PHB) 
    • Path of the Battlerager (SCAG) 
    • Path of the Ancestral Guardian (XG) 
    • Path of the Storm Herald (XG) 
    • Path of the Zealot (XG) 
  • Bard
    • College of Lore (PHB) 
    • College of Valor (PHB)  
    • College of Glamour (XG)  
    • College of Swords (XG) 
    •  College of Whispers (XG) 
  • Cleric
    • Knowledge Domain (PHB) 
    • Life Domain (PHB) 
    • Light Domain (PHB) 
    • Nature Domain (PHB) 
    • Tempest Domain (PHB) 
    • Trickery Domain (PHB) 
    • War Domain (PHB)  
    • Death Domain (DMG) 
    • Arcana Domain (SCAG)
    • Forge Domain (XG) 
    • Grave Domain (XG) 
  • Druid
    • Circle or the Land (PHB) 
    • Circle of the Moon (PHB) 
    • Circle of Dreams (XG) 
    • Circle of the Shepard (XG) 
  • Fighter
    • Champion (PHB) 
    • Battle Mastermind (PHB) 
    • Eldritch Knight (PHB) 
    • Purple Dragon Knight (SCAG) 
    • Arcane Archer (XG)  
    • Cavalier (XG) 
    • Samurai (XG) 
  • Monk
    • Way of the Open Hand (PHB) 
    • Way of Shadow (PHB) 
    • Way of the Four Elements (PHB) 
    • Way of the Long Death (SCAG)  
    • Way of the Sun Soul (SCAG/XG)  
    • Way of the Drunken Master (XG)  
    • Way of the Kensei (XG)
  • Paladin
    • Oath of Devotion (PHB) 
    • Oath of the Ancients (PHB) 
    • Oath of Vengeance (PHB) 
    • Oathbreaker (DMG) 
    • Oath of the Crown (SCAG) 
    • Oath of Conquest (XG)  
    • Oath of Redemption (XG) 
  • Ranger
    • Hunter (PHB) 
    • Beast Master (PHB)  
    • Gloom Stalker (XG) 
    • Horizon Walker (XG) 
    • Monster Slayer (XG) 
  • Rogue
    • Thief (PHB) 
    • Assassin (PHB) 
    • Arcane Trickster (PHB) 
    • Mastermind (SCAG/XG) 
    • Swashbuckler (SCAG/XG) 
    • Inquisitive (XG)
    • Scout (XG) 
  • Sorcerer
    • Draconic Bloodline (PHB) 
    • Wild Magic (PHB) 
    • Storm Sorcery (SCAG/XG)  
    • Divine Soul (XG)  
    • Shadow Magic (XG) 
    • Favored Soul (UA)
    • Phoenix Sorcery (UA)
    • Sea Sorcery (UA)
    • Stone Sorcery (UA)
  • Warlock
    • The Archfey (PHB) 
    • The Fiend (PHB) 
    • The Great Old One (PHB) 
    • The Undying (SCAG)  
    • The Celestial (XG) 
    • The Hexblade (XG) 
  • Wizard
    • School of Abjuration (PHB) 
    • School of Conjuration (PHB) 
    • School of Divination (PHB) 
    • School of Enchantment (PHB) 
    • School of Evocation (PHB) 
    • School of Illusion (PHB) 
    • School of Necromancy (PHB) 
    • School of Transmutation (PHB)  
    • Bladesinging (SCAG)
    • War Magic (XG)
List of Backgrounds
  • Guild Artisan (PHB)
  • Gladiator (Entertainer) (PHB)
  • Hermit (PHB)
  • Guild Merchant (PHB)
  • Entertainer (PHB)
  • Folk Hero (PHB)
  • Acolyte (PHB)
  • Charlatan (PHB)
  • Criminal/Spy (PHB)
  • Outlander (PHB)
  • Noble (PHB)
  • Knight (Noble) (PHB)
  • Sage (PHB)
  • Soldier (PHB)
  • Sailor/Pirate (PHB)
  • Urchin (PHB)
  • Far Traveler (SCAG)
  • Faction Agent (SCAG)
  • Cloistered Scholar (SCAG)
  • Clan Crafter (SCAG)
  • City Watch (SCAG)
  • Courtier (SCAG)
  • Knight of the Order (SCAG)
  • Mercenary Veteran (SCAG)
  • Inheritor (SCAG)
  • Investigator (SCAG)
  • Urban Bounty Hunter (SCAG)
  • Uthgardt Tribe Member (SCAG)
  • Waterdhavian Noble (SCAG)
In addition to all this, many of the published modules have cool backgrounds in them that are tailored to that module, and characters made specifically in those settings will have access to those backgrounds.  Also, anything you can dig out of the Unearthed Arcana will be considered on a per-item basis, just to make sure we use the most up-to-date version, where ever it may appear.  After anything is included in a game it will be logged here and the proper version noted.

Sunday, June 24, 2018

Better Random Dungeons

Whenever you're afraid, don't forget everything is random.
Inspirobot can soothe your fears.  Now with Mindfulness Mode.
Don't get me wrong, there's nothing wrong with the material presented in the Miniatures Handbook.  One thing, though, is that we don't always use cards, and in fact I've kind of grown to despise them as necessities for a game.  An aid, sure / fine.  As a necessity, it gets silly when they are always sold separately.  It was never an issue for me until the effects of prolonged exposure to the edition grinds of various wargames really began to set in.  Now I'm allergic to superfluity.

For D&D, we'll most likely use notebooks, post-its, index cards and ancient scrolls rather than fiddly cards we might not be able to track down anyway.  Also, we'll probably use a lot of different miniatures and other stuff that don't correspond to anything anyway.  Honestly, it has the widest customization potential of any wargame on the table these days.

In most of the scenarios for the campaigns we'll be using D&D Miniatures for, a lot of specifics will be noted in the entry.  There will be a DM for most of those battles, but it is also possible to do a co-op game.  What follows is a setup guide for a DM-less, random cooperative battle more tailored to our proclivities and collection.

Random Dungeons (or:  Don't Die Together)
  1. Layout the Dungeon
  2. Select Party
  3. Arrange Dungeon Table
  4. Determine Objective
  5. Determine Complications
Dungeon Layout

We have a myriad of ways to setup a 3d dungeon, and in truth you could setup a dungeon using various terrain features as "rooms".  The basic D&D dungeon calls for a number of rooms, and other than basic wargames terrain we have a few methods that could be used by the players to setup an agreeable layout.

Using D&D Dungeon Tiles and a Chessex map, setup a dungeon using the tiles as rooms.  We also have some old home-made dungeon tiles that could be used to create corridor and room layouts in a similar manner.  D&D Adventure Game tiles could also be used, such as those from Castle Ravenloft or the Temple of Elemental Evil.

Select Party

Players build a party whose total levels add up to the required Total Party Levels for the level of the dungeon.  Generally, any combination of creatures is fine.  Use the DDM Database and you can modify models fairly easily.  The players will have to use common sense and try to be reasonable to create a game they both enjoy.

Arrange Dungeon Table

Instead of cards, we'll be using good ol' dice.  In standard games, we'll start with a d20 and 20 slots.  This array is filled in just as if they were cards, e.g. with monsters and special encounters as the players like.

At the beginning of encounters, a d20 is rolled for each character in the party (usually 4 per turn). The rolled results comprise the encounter, as normal.  As each entry is encountered, it is removed from the list.  Once the list begins to dwindle, switch dice types as necessary to eliminate repetition of results.  In addition, if the players like, the dungeon table can 'evolve' as normal simply by replacing entries by rolling for them on the evolution's dungeon table as if it were the deck.

To make dungeon tables larger, each list entry may have multiple possibilities.  Dice for which sub-options are available randomly.  When an individual result is rolled, ONLY that possibility is encountered and thus removed from the sub-option list.

For instance, an entry labeled [Orcs] may include sub-options, such as Orc Warrior, Orc Shaman, or Orc Lurker.  Rolling D3, the Lurker is found to be the encounter.  The Lurker is removed from the table.  The parent entry will not be removed until all the [Orcs] have been removed.

To reduce the amount of rolling required when determining encounters, when a result is empty on the table, move sub-options to the empty slots.  For instance, entry 15 is an [Orc] with three sub-options, entry 12 has a [Barbarian] entry with no sub-options.  If the [Barbarian] option is used before the [Orc] entry is down to one sub-option, move one of the [Orc] sub-options at entry 15 to the empty entry at 12.

Where bosses are used, it's best to have one entry for that boss alone.  Bosses can escape once or twice as normal.

The standard spread we will start with is:
  • 15 creature / trap entries adding up to AT LEAST the Total Target CR for the dungeon level (including a boss if warranted).  Use the appropriate CR Range; the number noted after the semi-colon is an appropriate boss level.
  • 1 Roll Twice Result
  • 4 Special Card Results
    • Statue or other Objective
    • Feature Encounter (Such as Healing Fountains)
    • Friend, Enemy or other Special Card
Determine Objective

There are three possible objectives for a random co-op dungeon.  Roll 1d3 to determine randomly.
  1. Defeat the Monsters
    • Destroy monsters equal to the Total Target CR for the Dungeon Level
  2. Find the Statues
    • Special Card Results must have four Statue Options.  Find all four statues.
  3. Rescue the Friends
    • Special Card Results must have four Friends Options.  Find all four friends and make sure at least 3 escape the dungeon.
Dungeon Level Total Party Levels # of Rooms CR Range Total Target CR Complications
1 4 5 1/4 to 1; 2 8 1d2-1
2 8 5 1/2 to 2; 3 16 1d2
3 12 6 1/2 to 3; 4 24 1d3
4 16 6 1 to 4; 5 32 1d4
5 20 8 1 to 5; 7 40 1d4

When arranging encounters, be advised they may be difficult.  All monsters are by default in the same group.  Each encounter drops one treasure as normal.

Determine Complications

Using the table above, determine the number of complications that will harangue the adventurers.  Then roll 1d10 for each complication and apply the results.
  1. Wandering Monsters in effect (use a 1d10 table).
  2. Upgrading Wandering Monsters in effect (1d10 table, 1d6 upgrade table).
  3. Lurkers.  Add a Lurker entry to each dungeon and wandering monster table.
  4. Twin.  Add two Twin results to the dungeon table and determine the Twinned monsters.
  5. Multiples are in effect.  Roll 1d6:  1-2 add two "x2" results to the dungeon table, 3-4 add two "x2" and one "x3" results to the dungeon table; 5-6 add two "x3" and one "x4" results to the table.
  6. Time is of the essence.  Add "Draw +1" to the dungeon table.
  7. Lock & Key.  Add one Lock and one Key to the dungeon table.
  8. Habitual monsters.  Select 1d4+1 monster entries and apply random habits, rolling 1d6 for each entry.
    1. Bloodthirsty
    2. Distracted
    3. Greedy
    4. Hateful
    5. Mindless
    6. Calculating:  Creatures in this group receive +4 to their initiative scores.
  9. Special Terrain.  Select (1d4 + Dungeon Level) appropriate special effects and assign them to appropriate areas of the dungeon.
  10. Enemy Mine.  Add a number of Enemies to the dungeon table equal to the dungeon level.
This is the system we will use where a 'random' dungeon is called for while on campaign.  It will be a full experience setting up the dungeon, and will require a little more time for setup than a normal wargame.  However, the amount of options we have using the 3rd Edition ruleset is parallel to none.

Sunday, June 17, 2018

The Well of Frostgrave

So, I needed a well for Frostgrave.  As no doubt many of you know, Frostgrave has lots of different scenarios, and a lot of them call for specific terrain and models.  Nothing wrong with that, since wargames of old used to proscribe every detail of the battles.  The only problem I'm going to have with that going forward is storage, but I can probably devote two cases to Frostgrave...maybe two cases.

They are large cases.

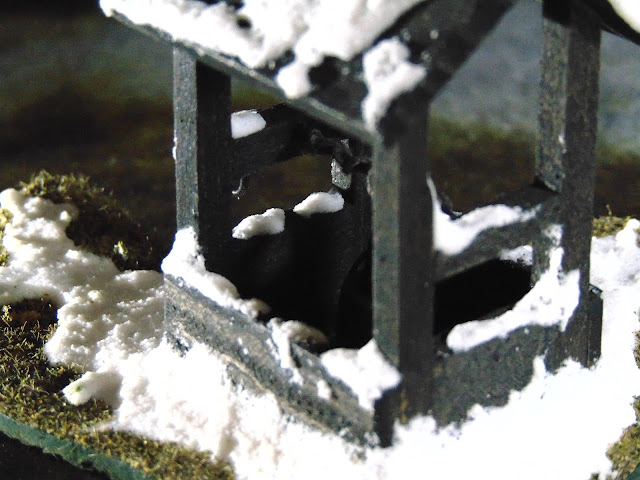
Frostgrave Well Snow Texture
Angled the light to get a better view of the texture.
Going right down the list, the first thing I need is a well.  I had originally intended on making this from a large piece of styrene, but that started looking more like a fountain.  Then, on a random trip to the Hobby Lobby my Lady pointed out some interesting pieces tucked away in the back.  One was a model well, with functioning bucket and everything...and they only wanted like $1 for it.  Or something like that.

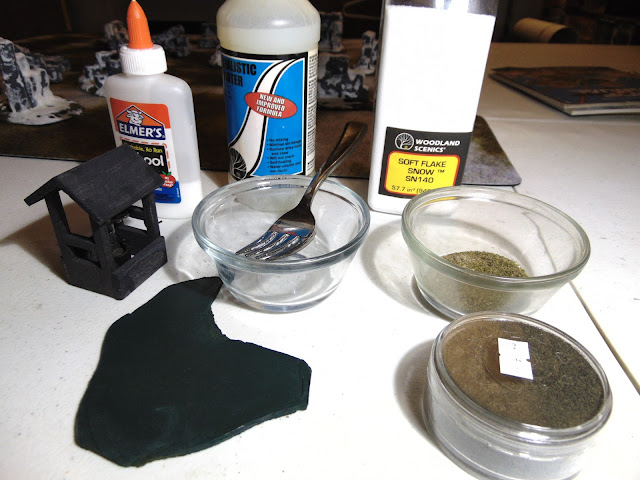
Frostgrave Well Ingredients
...also, glue and mixing bowls. 
Anyway, I needed a well. So here's what I did:  I took the well piece, and decided I didn't need to do anything else to it.  Add that to a small, irregularly cut piece of MDF, and the rest of the elements I'm using in the Frostgrave set.  Namely, Woodland Scenics Soft Flake Snow and GaleForce9's Dirt.  There's also some modelling sand and a little static grass thrown in there...but I'm not even sure what project that stuff came from so I can't give you a product there.

It's mostly sand, though.

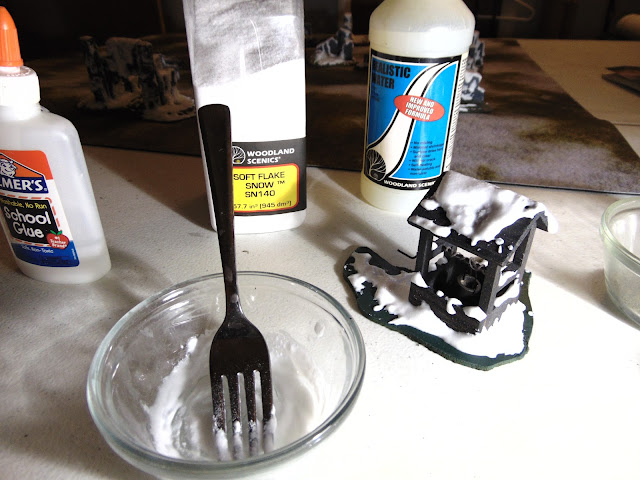
Frostgrave Well Snow Mixing
Consistency is key.  I'm going to have to start measuring ingredients.
Mixing up the glue and snow, I decided to use a different method than I had used in the building of the ruins.  This time, I simply applied the snow first.  The idea was that the water in the glue might not leach the dye out of the flock underneath if there is no flock underneath.

I had also planned on using the Woodland Scenics Realistic Water, but after the yellowing of the last use I decided I'd experiment with that independently at a later date.  The green underneath in the well was a satin and kinda reflective already.  Couple that with the realization that this well had to be made fairly recently...or was made of magical wood that somehow withstood the elements.  Either way, with the inclement weather around Frostgrave this well is almost flowing over.

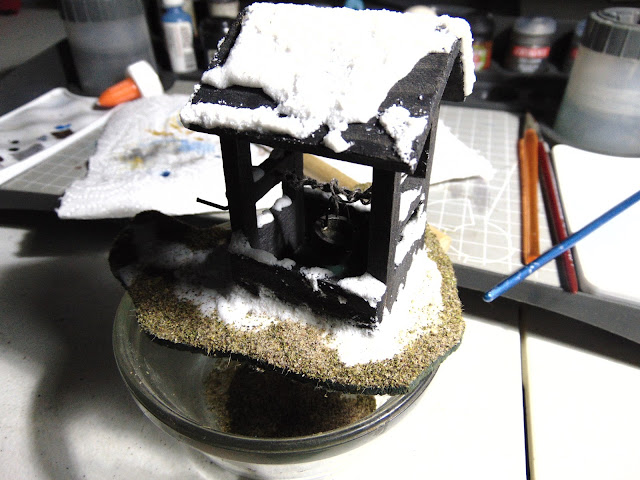
Frostgrave Well Snow and Flock Layering
First layer of snow and flock.
I didn't have any dye leaching but I did have another issue that showed up after applying the flock.  After I showed the Lady, it was pointed out to me that the snow was only level with the ground and I'd need to apply another layer.  There was also some cracking around the base of the well where the snowdrifts were piled due to the drying of the glue pulling apart the shape of the drift.  This left little rents in the snow that almost looked like the muddy puddles that form when melting snow from a roof drip-drops all day over the eaves.

The Well of Frostgrave
The Well of Frostgrave, or, the Worst Place to Drink.
Adding a layer of snow to fill in the gaps and make the snow rise above the flock was harder than I thought it would be, but was still pretty easy.  Watch texturing during this phase.  I'm sorely tempted to try out Flex-Paste next time but I'm unsure about how that will stand up to actual use, such as having models trampled across it.  Anyone with experience with that product that cares to share it in the comments would be greatly appreciated.

Frostgrave Well Line of Sight
Lots of different animals are drawn to waterin' holes.
I promise to get better lights...but the snow is just glaringly white anyway.  I angled some lights to show the texture instead of the camera just being snowblinded.  It looked like I had sloppily painted solid white onto it instead of looking like a three dimensional construct.

The Well of Frostgrave has water, but it's very icy.
If you don't think you'll get shot over this here waterhole, you've come to the wrong neighborhood.
All in all, just a small piece for Frostgrave, but a scenario specific one.  It was a quick and easy build, done on the side amidst all my other projects to account for the drying time of the glue, which was a few hours.  Also, it was cheap and I didn't have to work hardly at all.  I consider this one a win.

Sunday, June 10, 2018

Rogue Star Wars

Amidst the turmoil of the Deathwind Corridor, countless small dramas play out with little fanfare or visibility.  The lives of the rebel soldiers, Imperial personnel and innocent bystanders all move along at the same pace, more or less.  Heroic actions, horrific atrocities and humble day-to-day life all come to pass as the Galactic Civil War grinds on, and little does the wider society even know.

As they may loudly claim, there are heroes and villains on all sides.  In the ongoing turmoil around planet Roon and the Cloak of the Sith, a drama begins to unfold involving all three factions vying for power and position in the area.  These small groups become tied up together in what will become an ongoing vendetta for some, and a long nightmare for others.

The aqualish bandito Urdaaghr Buru and his band of cutthroats begin the campaign on the planet Bothawui, near the northern polar region.  Amidst the snow and ice, their talks with the rebel Spynet have fallen through.  Feeling dejected and put upon by the snide Spynet representative, Buru and his men decide to take plunder from the foolish rebels before heading back to Roon.  Buru Brothers Shipping & Handling, Inc. are not to be trifled with.

Captain Namus Vance of the Rebel Alliance takes note of the attack, and his team has another mission that happens to take them in the direction that Buru's Crew are traveling.  No doubt they'll have trouble with the pirates again before they are able to execute their mission:  sabotage of an Imperial patrol ship near the Cloak of the Sith, and the retrieval of the records it carries.

Yet the Imperials are being proactive.  The bounty hunter Halse Balgi is tracking all the known fugitives in the area, and is working closely with the Imperial army.  With the cutthroat mercenary rooting out the criminals, the Imperials are hot on the heels of both the rebels and the cartels.
Bothawui [800x800]
We begin on the mountainous slopes of Bothawui's northern pole...
Campaign Rules
This mini-campaign follows three teams of fighters amidst the Galactic Civil War, using the Rogue Stars ruleset published by Osprey Wargames.  There will be three sets of missions, each with a different theme and map set.  During each mission set, each of the three teams will fight a total of four battles, gaining experience with each encounter.

Each team may attack each other team once, and will be attacked by each other team once during each mission set.  Each faction's missions are noted below, showing each factions' attack on each other faction by initials.  Once all missions in a set are complete, play moves on to the next set.  There is no set order of playing missions within a set, so they can be played as opponents are available.

For each scenario win, 1 campaign point is awarded to that team.  Each team must win in it's own scenarios.  No points are awarded for losses, or winning a scenario that isn't your mission, but experience is gained as normal for each game.  The team with the highest number of campaign points wins, with total experience gained as the tiebreaker.
  1. Bothawui Polar Region Missions
    • All missions count as Ice Planet terrain.
    • Cartel Missions:  Steal Valuables (R); Smuggling (I)
    • Rebel Missions:   Hacking Mission (I); Manhunt (C)
    • Imperial Missions: Bodyguard Work (R); Secure Area (C)
    • Roll for Complications as normal.
  2. Attack on the Lightstation
    • All missions are Low Gravity Planet terrain except where noted.
    • Cartel Missions:  Ambush (I); Hacking Mission (R)
    • Rebel Missions: Boarding Action [Spaceship Terrain] (I);  Space Gladiators (C)
    • Imperial Missions:  Abduction (C); Control Terrain (R)
    • Roll for Complications as normal.
  3. The Dark Side of Roon    
    •  All missions are Dense terrain except where noted.
    • Cartel Missions
      • If the Imperial Abduction mission in Set 2 was successful, Rescue (I); otherwise Make it to the Ship Alive (I)
      • Repair (R)
    • Rebel Missions
      • If the Cartel Hacking Mission in Set 2 was successful,  All-Out Battle (C); otherwise Duel (C).
      • Destroy Property (I)
    • Imperial Missions
      • If the Rebel Boarding Action mission in Set 2 was successful, Explore a Wrecked Ship [Wrecked Spaceship Terrain] (R); otherwise Interrogation (R)
      • All-Out Battle (C)
    • Roll for Complications as normal.
(C) Cartel;  (R) Rebel;  (I) Imperial.

The missions are designed to be played over the next few months as we expand our terrain galleries.  As such, the planets depicted will correspond to the first three sets we finish and serve as an alternate way to frame the assets.  We'll also get to see the Rogue Stars system work over a 12 game span for each team.

The narrative outcome of this campaign will affect the Star Wars campaigns in general in the next iteration.  If the Cartel wins, they'll have a lot more resources as they will be able to outmaneuver the other forces.  If the Imperials win, much of the Cloak of the Sith will be impassable for both the rebels and cartels.  If the Rebels win, they'll have a safe base in the Cloak and passage through Deathwind Corridor.  In any event, the outcome will have far-reaching implications.

Sunday, June 3, 2018

Nether War: Evil Outpost Scenarios

Dungeons & Dragons: The Nether War
It gets worse before it gets better.

The Nether War has begun!

The following are the scenario lists for all Tier 1 Evil bases, i.e. outposts.  Each outpost has two scenarios to be cleared, a D&D Attack Wing scenario and a D&D Miniatures scenario.  These scenarios are quick and easy for new players to enjoy.

Victory conditions and bonuses are likewise kept simple for this part of the campaign...but it all ramps up from here.


Tier 1 - Evil Outposts

Zhentarim Outpost
Zhentarim Outpost
A camp at the base of the Nether Mountains from which the Zhentarim coordinate efforts with the Cult and their Morueme masters.
  1. Scenario 1
    • Standard D&D Miniatures; 50 point Skirmish.
  2. Scenario 2
    • Standard Attack Wing; 120 Legion Points.
If the Good player clears the base on the first try, he deploys his entire Skirmish force after the opponent's entire Skirmish force in the first Skirmish of the next attack.


Cult Outpost
Cult Outpost
At the edge of the High Forest, the Cult has its eyes and ears waiting for telltale movements of the Enclave.
  1. Scenario 1
    • Standard D&D Miniatures; 50 point Skirmish.
  2. Scenario 2
    • Standard Attack Wing; 120 Legion Points.
If the Good player clears the base on the first try, he deploys his entire Skirmish force after the opponent's entire Skirmish force in the first Skirmish of the next attack. 


Zhentarim War Camp
Zhentarim Warcamp
Mustering far from the main front of the war to come, reserves for the dragon's armies prepare for battle on the other side of the mountains.
  1. Scenario 1
    • Standard D&D Miniatures; 100 point Skirmish.
  2. Scenario 2
    • Standard Attack Wing; 120 Legion Points.
If the Good player clears the base on the first try, he deploys his entire Skirmish force after the opponent's entire Skirmish force in the first Skirmish of the next attack.


Cult Shrine
Cult Shrine
In the foothills at the base of Nether Peak, the Dragon Cult keeps a temple and simple altar where they meet regularly.  Rituals of supplication and sacrifices are made to the Morueme.
  1. Scenario 1
    • Standard D&D Miniatures; 100 point Skirmish.
  2. Scenario 2
    • Standard Attack Wing; 120 Legion Points.
If the Good player clears the base on the first try, he deploys his entire Skirmish force after the opponent's entire Skirmish force in the first Skirmish of the next attack.


Black Market
Black Market
A lucrative operation in the foothills outside Jalanthar is obtaining weapons for use by the cultists and mercenaries making up the armies of the dragons.
  1. Scenario 1
    • Standard D&D Miniatures; 200 point Skirmish.
  2. Scenario 2
    • Standard Attack Wing; 120 Legion Points.
If the Good player clears the base in one attack, 1 Good Dragon costs 50% less Legion Points (before upgrades) in the first Attack Wing scenario in the next attack.